

How To Use Gimp To Compress Images For Your Blog
You've probably heard the phrase image optimization before, especially if you add a lot of images to your WordPress website. But how can you optimize your images in WordPress?
It's an important question, but the solution is very simple!
Even if you aren't familiar with image editing software like Photoshop or Illustrator, you can easily optimize the images and make your website lightning fast.
In this post, we'll cover everything you need to know about image optimization. First, we'll explain why you should optimize your images. Then, we'll examine some other factors that influence how fast images load on your site.
Following that, we'll cover two important ways to optimize your images – before and after you upload them to your site.
Finally, we'll cover some other nifty tricks for keeping your site loading super fast.
Let's get optimizing!
- What Does Optimizing Your Images Mean?
- Why Should You Optimize Your Images?
- Things to Keep in Mind
- The Best Ways to Optimize Your Images
- Other Best Practices to Optimize Images for the Web
- Image Optimization and WordPress
What Does Optimizing Your Images Mean?
While the term seems complicated, the reality is not. Optimizing your images simply means shrinking them to a smaller file size while still retaining a high-quality visual.
The optimization process is essentially one of balancing file size with image detail. Depending on the type of image you're using, the nature of your website, and many other factors, you'll want to either balance the two equally or optimize for one or the other.
In practice, optimizing images is very easy. There are really only two steps:
- Optimize the image before uploading it to your site
- Install a plugin that automatically optimizes images already uploaded and any new images uploaded in the future
That's really all there is to it! Everything else is just fine tuning the details.
Why Should You Optimize Your Images?
There are a number of reasons why you need to optimize images. Some of which may not be obvious.
Let's cover six of the most important ones, page loading speed, mobile devices, SEO, backups, bandwidth, and storage space.
Page Loading Speed
Optimizing images on your website will decrease your website loading time. And speed is absolutely essential if you want readers to stick around. If a visitor lands on your site and has to wait more than a second or two, they'll probably just leave and never come back!
By optimizing your images and photos, using a WordPress theme that has a small size, and doing other things to speed up your site, you'll keep visitors on your website.
Faster on Mobile
According to Statista, visitors using mobile devices make up over half of total internet traffic.
That's a lot! This means that having a mobile-optimized website is critical, and one way to do that is by having a lightweight WordPress theme and optimized images.
Improve Your SEO
Search Engine Optimization, (SEO), is important to every website that depends on search engine traffic.
Smaller images mean that pages load faster. Faster pages mean that Google ranks your site more favorably. And a better rank from Google means that you'll be higher up in search results.
The opposite is also true: Google punishes slow websites, causing you to appear lower in search results.
If you get a lot of users or visitors from search engines, this can be the difference between success and failure!
Backups are Faster
If you back up your site on a regular basis (and you should!), either manually or with a WordPress backup plugin, optimizing your images can be helpful.
There are two reasons why:
- The backup will take less time to create, as the files are smaller and require less time to compress
- The backup file will be smaller and take up less space
Less Bandwidth
Websites with smaller file sizes (and fewer files overall) consume less bandwidth than sites with a ton of large images. During peak traffic times, this can be the difference between your website loading in 3 seconds or half a minute.
Bandwidth is defined as "the maximum amount of data transmitted over an internet connection in a given amount of time." In essence, it means the amount of data you can send at once.
As such, optimizing your images can reduce the amount of bandwidth that your site consumes, the faster your site will run and the less loading issues you'll have to deal with.
Less Storage Space Required
Smaller images mean you need less space on your web host. This, in turn, means that you will be less likely to run over the storage limits on your web host. Most hosts charge you extra fees if you run over, so you definitely want to avoid doing so!
If you're a photographer, filmmaker, or other media professional, you probably have a lot of large files on your website. This makes image compression a necessity. By creating optimizable photos, you can avoid having to buy an expensive hosting plan with a lot of storage.
By optimizing your images, you can dramatically cut down on the storage space required to maintain it all – saving you a bit of cash on your monthly bill, too!
Things to Keep in Mind
Now that we know why you should optimize your images, let's talk about some other aspects to be aware of.
As with any technical decision, there are many different tradeoffs to choose between. To create optimizable photos, there is no "one size fits all" situation for everyone.
Quality vs. Size
When it comes to images, the biggest tradeoff is between image quality and image size. It's important to keep two general principles in mind:
- Higher image quality = Larger file size
- Smaller file size = Lower image quality
While some types of images can be compressed without losing quality, the above rules are true most of the time.
Image Dimensions
How large of an image do you need? It depends. For the most part, an image that is 5000px wide is completely unnecessary. Virtually no one will be visiting your site on a device with a resolution that large.
It also depends if images will be full-width or within content. If the image will be full-width, it is a good idea to keep it 1,500 and 2,500 pixels. If within content, a max-width of 1,500 is good, although typically 1,000 pixels is sufficient.
Compression
If you read about image compression, you'll often come across two words: lossy and lossless. What do these mean when you want to optimize your images?
As you can probably tell by the name, they describe the amount of data loss that occurs during the compression process.
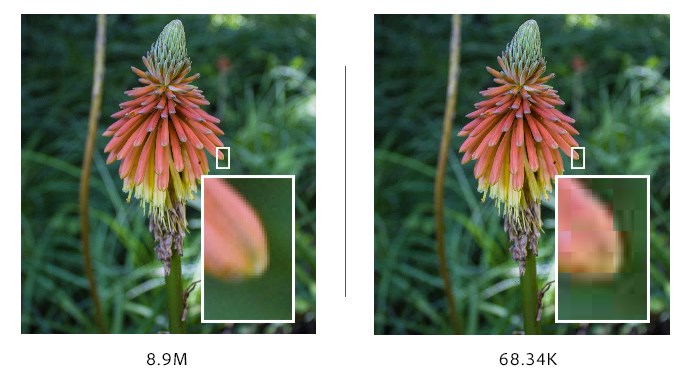
- Lossy compression has a slight loss in image quality due to the removal of pixels during the process. Lossy compression is preferable when the image quality needs to be good, but not perfect. Images in a blog post are a good use case.
- Lossless compression reduces file size with no noticeable loss of quality. However the file size will still be fairly large. Typically you want to use lossless compression if the image quality is of the utmost importance. If you're a photographer, for example, you definitely use lossless images.
You can see the difference in this image from ShortPixel's blog:
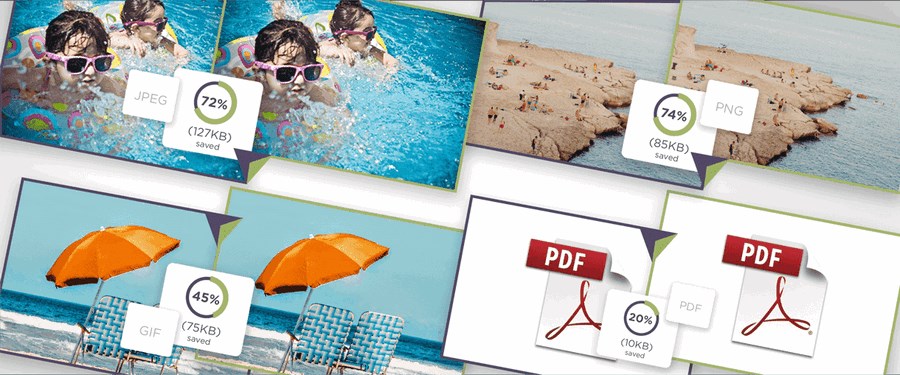
Image File Types (JPG, PNG, GIF, SVG, etc.)
When it comes to images, there are a few file types that people tend to use. These are PNG, JPG, GIF, and SVG. Each was designed for a different situation, so if you want to optimize your site for performance, it helps to use them correctly.
JPG
JPGs are primarily intended for images where the transition of one pixel to the next is smooth. In other words, if there are no lines that have a sharp contrast between them.
If you are using a photograph, it should probably be a JPG.
PNG
PNGs are lossless images, meaning that no data is lost during compression. However, this means that they tend to have a larger file size. In general PNGs are designed for transparent images, text, logos, and shapes that have clearly defined edges.
They aren't a good choice for high-resolution photographs.
GIF
GIF is an older image format that was popular before PNGs became widespread. Since PNG compression is significantly better than GIFs, it is usually preferable to use them. However, GIFs have a special ability. They support animation. Most animated images online are GIFs.
So, unless your image contains an animation, it's usually best to avoid GIFs and use PNGs or JPGs instead.
SVG
Scalable Vector Graphics (SVGs) are vector-based images. Vector-based just means that the images are composed of mathematical points rather than pixels. A logo is an example of a vector image, while a photograph is an example of a pixel-based image.
Since SVGs don't contain hundreds or thousands of pixels, they have a much smaller file size. You can also change the size of a SVG without much change to the file size.
If the images on your site are mostly made up of simple shapes and lines, consider using SVG versions of them.
The Best Ways to Optimize Your Images
Now let's walk through optimizing some images!
There are a few steps to consider.
Do You Really Need an Image?
Before anything else, ask yourself: do you really need an image? Unnecessary images can make your website load more slowly, so you should try to only use them if absolutely necessary.
First, Optimize the Image Before Uploading It to Your Site
Optimizing images before you upload them to WordPress means you can use powerful tools to balance image size and quality.
Photoshop
Photoshop is the best-known software application for image editing and processing.
To compress an image in Photoshop, go to File > Save For Web and Devices.
Then, select your desired file format, choose the compression level, and press Save.
GIMP
Don't want to use Photoshop? No problem. There are many other free image editing programs available. One of the most popular ones is called GIMP.
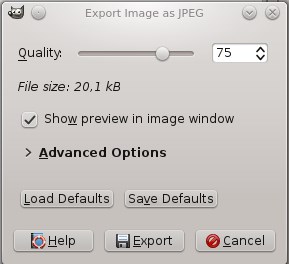
To compress an image in GIMP, go to File > Export As.
Then, under Select File Type (By Extension), pick your desired file type.
Then, drag the Quality setting to your desired compression/quality tradeoff level. Lower levels will have a smaller file size but have more image degradation.
To see how the image will look, be sure to enable Show preview in image window.
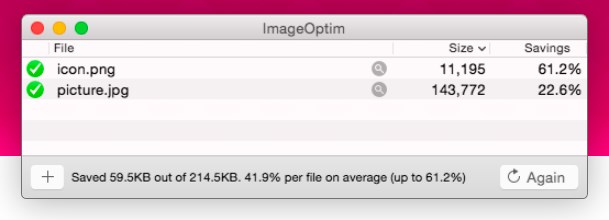
ImageOptim
ImageOptim is a Mac OSX app and web service that compresses your images without using lossy compression. The Mac app is open source and free to use, while the web service starts at $12 per month for 2,000 images.
Then, Use a Plugin
Compressed your images? Awesome! Now it's time to upload them to your site.
To do this, go to Media > Add New on your WordPress sidebar and upload all your images.
Once done, you should install a compression plugin. There are a number of different options available, both free and paid.
Let's go through some of the most popular WordPress compression plugins.
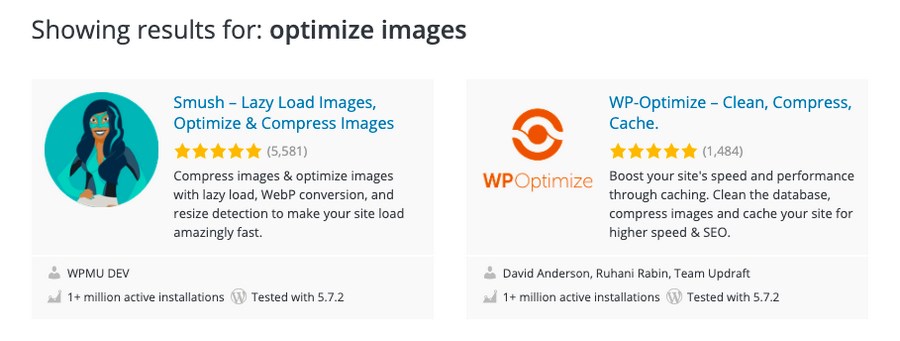
1. WP Smush
Smush is a plugin that lazy loads, compresses, and optimizes images. There are both free and paid versions of the plugin. The paid one lets you compress unlimited images, backup the original images, use a CDN for 45 locations, and automatically resize and scale images.
2. TinyPNG
TinyPNG is both an online tool and a WordPress plugin. The online tool quickly compresses images, while the plugin has a bevy of features. These include automatic optimization, background operation to speed up your workflow, effortless resizing with maximum widths or file sizes, progressive JPEG encoding, WooCommerce compatibility, and CMYK to RGB conversion.
You can also optimize the images already in your media library.
3. ShortPixel Image Optimizer
ShortPixel is a freemium plugin that optimizes any image or PDF on your website. It is designed to be easy to use and compresses everything automatically in the background.
There are both free and paid versions, with the paid version adding extra features like Cloudflare integration and automatic backups.
4. Optimole
Optimole is a real-time image processing plugin. There are both free and paid versions of the plugin available. One unique feature is that you can edit, resize, add filters, and make other adjustments to your photos. It also includes lazy loading.
5. Imagify
Imagify is a classic image optimization plugin. It's very easy to set up and even has a URL optimization wizard to get you started. A complex algorithm determines which image to display to which users, which helps keep loading times down.
6. ImageRecycle
ImageRecycle is another useful compression plugin available for WordPress and other platforms. They have a useful tool on their website which allows you to get a free analysis report of the images on your site.
Even if you end up using a different plugin, the test is worth going through to see what things you can improve. It's absolutely free to use and has no downsides.
7. EWWW Image Optimizer Cloud
EWWW Image Optimizer is a speed-oriented plugin. It has premium compression available for JPG, PNG, and PDF files. A unique feature is that it adaptively selects which image type is ideal to minimize the file size and maximize quality.
This is helpful if you use a wide variety of different images on your website. For example, PNGs for transparent images, animated GIFs on your blog, and JPGs for photographs of your products.
8. Optimus Image Optimizer
Optimus is a freemium plugin that helps you compress and optimize images that are PNGs and JPEG. The plugin compresses both the original image and all preview images. This is different from other tools like Photoshop and TinyPNG, which only affect the original image, not the generated thumbnails.
Other Best Practices to Optimize Images for the Web
Finally, let's cover a few other best practices for optimizing your images. While these aren't essential, they can collectively help make your site even faster.
Use a Caching Plugin
Caching is a technique that makes it easier for a web page to load. Instead of gathering images, text, and other files directly from the website every time, the plugin creates a snapshot of your content in order to load the page more quickly.
Using a caching plugin is an excellent way to lower the amount of time it takes to load pages. Most of these plugins also compress your images, which are often the largest files on your site.
Use a CDN
A CDN (Content Delivery Network) is a geographically distributed network of servers and data centers.
CDNs store cached versions of your website's content (such as images, HTML, and CSS) in different locations around the world. Then, when someone visits your site, the content is sent from the nearest location to the user (called a Point-of-Presence). As a result, everything loads much more quickly.
There are many different CDNs available, but two of the most popular ones are Akamai and Cloudflare. Using one is definitely a good idea, especially if your visitors are geographically diverse.
SVGs and Vector Images
SVG, which stands for Scalable Vector Graphic, is a type of file used to show two-dimensional images. It is different from other image types (JPG, PNG) because it stores images as vectors, which are made up of mathematical points instead of pixels, like rasters.
Raster graphics are made up of bitmaps, which are grids of individual pixels.
In the image below, you can see the difference. If we zoom in on the S in the left image (Raster), we can see that it consists of a number of pixels. Each pixel is a single color. While this is a great way to display complex changes of color, it means that you need a pixel for each and every color – which can add up to a large file size.
On the other hand, the S in the right image (Vector) doesn't have this issue. If we zoom in on it, it's exactly the same. This is because the S is not made up of pixels, but of a mathematical formula. If we double the size of the distance between two points on the S, then the image simply becomes larger. There are no tiny pixels involved.
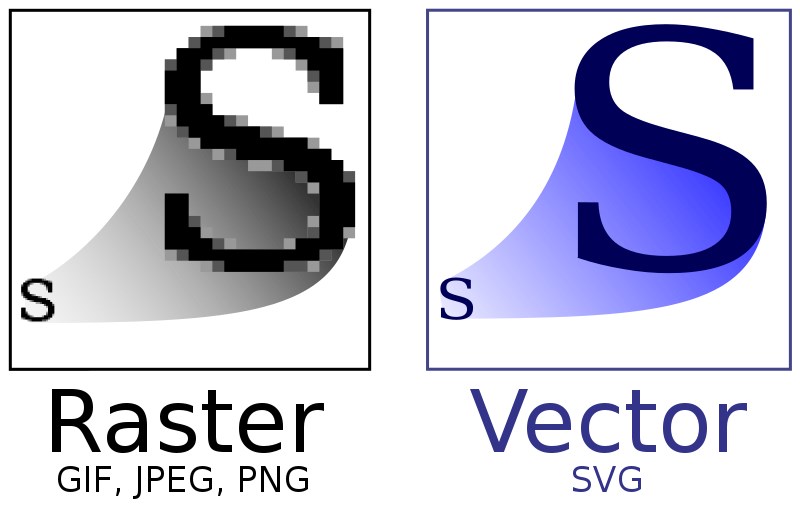
There are two big advantages to using Vector graphics: first, the file size is much smaller. Second, the image can scale to any dimension without making the file size noticeably larger. As you can imagine, this will speed up your website quite a bit!
To use SVGs on your site, you'll need to install a specific plugin on your site. We recommend SVG Support.
If you're using Astra, you'll be glad to know that Astra 3 utilizes SVGs. We've replaced font icons with SVG icons, which makes them crisper, especially on mobile devices. It also reduces the need to load any extra fonts, making everything load much more quickly.
Blur-Up Technique
This unique method is a way of using CSS to display a temporary background image while a larger, more detailed image is loading.
By using a tiny image and a gaussian blur effect, you can avoid going from a blank background to a fully-detailed image.
If you're comfortable working with CSS and use a lot of background images, the blur-up technique is definitely something worth looking into.
Read this tutorial on CSS-Tricks.com for more details.
Lazy Loading Plugins or Themes
"Lazy loading" is a technique that only loads images as the user scrolls to them. For example, if the user leaves a page before reaching the bottom of the page, the images there won't be loaded. This can save you a ton of bandwidth!
Most image optimization plugins include lazy loading functionality. However, others like WP Rocket Lazy Load or a3 Lazy Load only focus on the lazy loading feature.
Astra has featured lazy loading since January 2021, so if you're using the most popular theme for WordPress, you're good to go!
Use a Lightweight Theme
Finally, one of the most important best practices you can implement is using a lightweight theme. When it comes to file size, themes are often the single largest part of your website.
Unfortunately, many themes are not designed to minimize file size and focus more on presenting an impressive visual appearance.
Luckily, there are still some themes designed to be very lightweight. At only 50KB, Astra is one such theme. It loads in less than half a second, which means that the rest of your website's content (images, videos, etc.) will load even more quickly.
Image Optimization and WordPress
At this point, your images should be blazing fast! If your site uses a lot of imagery, it's very important to use the optimization techniques we mentioned above.
In this post, we learned how to optimize images for your website. While the phrase can seem intimidating, it's actually quite simple. You really just need to compress your images before uploading them to your site, and then install a plugin. That's it!
It also helps if you do other things like implement the blur-up technique, use a lazy loading plugin, or utilize a CDN.
How do you optimize images? Share your secrets in the comments! You can share some of your images, too!
How To Use Gimp To Compress Images For Your Blog
Source: https://wpastra.com/optimize-images/
Posted by: morrislikendooked1945.blogspot.com
0 Response to "How To Use Gimp To Compress Images For Your Blog"
Post a Comment